

You log into your dedicated server to perform routine maintenance, and immediately, your monitoring dashboard flashes a massive red warning: Disk Space Critical. Confused, you check your primary partition, only to discover that your /var/log/syslog or /var/log/messages directory has ballooned to 50 GB or more.
You run a tail -f on the log file, and your terminal screen becomes a blur of identical, rapidly scrolling text:
pcieport 0000:00:1c.0: AER: Corrected error received: 0000:01:00.0
pcieport 0000:00:1c.0: PCIe Bus Error: severity=Corrected, type=Physical Layer, (Receiver ID)
Panic sets in. You recently upgraded to blazing-fast Gen 4 or Gen 5 NVMe drives, and now the Linux kernel is screaming about hardware bus errors thousands of times per second. Is your expensive new NVMe drive dying? Is the motherboard failing?
Take a breath. In the vast majority of cases, your hardware is perfectly healthy. You are simply experiencing a PCIe AER log flood—a highly common, frustrating anomaly caused by a miscommunication between modern high-speed storage controllers, motherboard power management protocols, and the Linux kernel.
In this comprehensive tutorial, we will explain exactly what PCIe Advanced Error Reporting (AER) is, how to verify that your NVMe drive is not actually failing, and provide step-by-step instructions to apply the pci=noaer fix or disable ASPM in your GRUB bootloader to permanently silence the noise and reclaim your disk space.
What You'll Learn
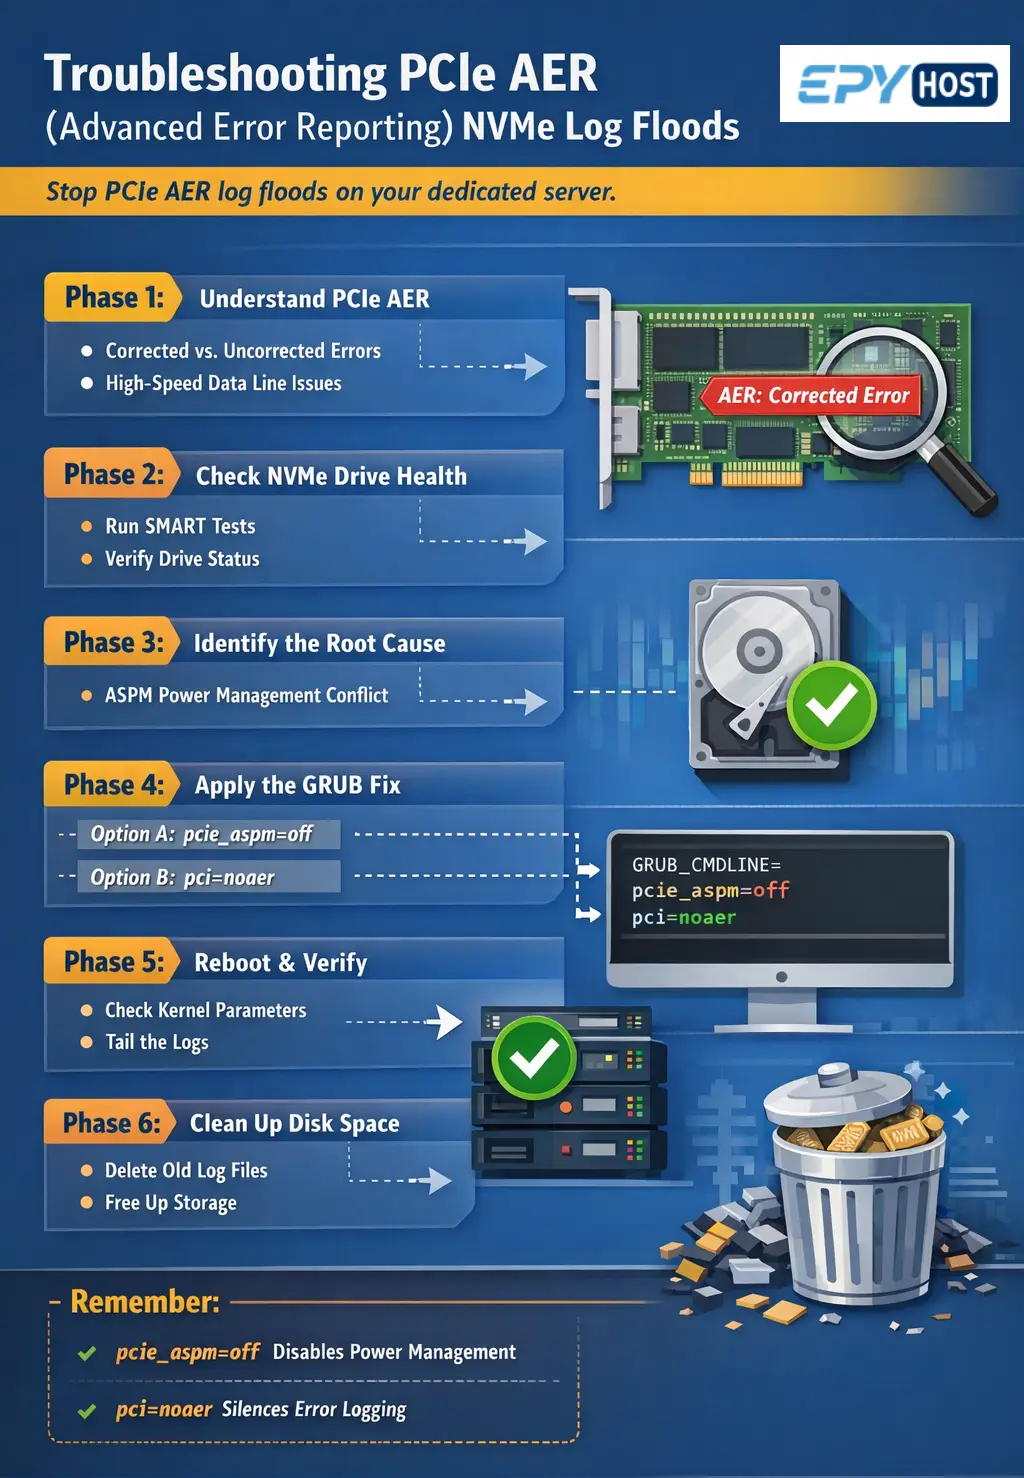
Phase 1: Understanding the Suspect (What is PCIe AER?)
Phase 2: Diagnosing the Hardware (Is the NVMe Drive Dying?)
Phase 3: The Root Causes (ASPM vs. Linux)
Phase 4: Applying the GRUB Bootloader Fix
Phase 5: Rebuilding GRUB and Rebooting
Phase 6: Verification and Cleaning Up the Mess
Conclusion
Phase 1: Understanding the Suspect (What is PCIe AER?)
Before we apply a patch, you need to understand the error message.
When data travels between your NVMe drive and your server's CPU, it travels across the PCIe (Peripheral Component Interconnect Express) bus. Modern Gen 4 and Gen 5 NVMe drives move data at absurd speeds—up to 14,000 Megabytes per second. At these extreme frequencies, physics dictates that occasional signal degradation, electrical noise, or microscopic timing mismatches will occur.
To handle this, the PCIe specification includes Advanced Error Reporting (AER). AER acts like an incredibly fast, microscopic spellchecker for your hardware data lanes. It categorizes errors into two types:
Uncorrected Errors: These are fatal. The data was corrupted in transit, could not be salvaged, and the system must likely halt or crash to prevent data corruption. (If you see these, you have a real hardware problem).
Corrected Errors: The hardware detected a tiny signal anomaly, instantly fixed it at the physical layer, and the data arrived perfectly intact. No data was lost, and no performance was noticeably degraded.
The Frustration
The problem is not that the error happened; the problem is that the hardware is over-reporting it. For every single tiny, automatically fixed signal anomaly, the PCIe port sends an interrupt to the Linux kernel, saying, "Hey, I fixed a typo!" The Linux kernel obediently writes that "Corrected error received" message into your syslog.
When this happens 10,000 times a second, it eats up CPU cycles, obliterates your disk space, and masks actual, critical system logs.
Phase 2: Diagnosing the Hardware (Is the NVMe Drive Dying?)
Before we mute the kernel, we must absolutely verify that we are dealing with harmless "Corrected" errors and not a failing drive. We need to map the PCI address in your log file to the physical hardware and run a SMART health check.
Step 1: Identify the Hardware Generating the Error
Look at the error spam in your logs. You will see a PCI address, usually formatted like 0000:00:1c.0 or 0000:01:00.0.
Run the lspci command to see what hardware is sitting at that address:
lspci | grep -i "01:00.0"
(Replace 01:00.0 with the exact address from your log).
You will likely see output similar to: 01:00.0 Non-Volatile memory controller: Samsung Electronics Co Ltd NVMe SSD Controller PM9A1/PM9A3/980PRO
This confirms the log spam is coming from the PCIe lane connected to your NVMe drive.
Step 2: Check NVMe SMART Health Status
Next, we will use nvme-cli (the standard utility for dedicated server NVMe troubleshooting) to interrogate the drive directly. If the drive is actually dying, its internal SMART logs will tell us.
Ubuntu/Debian:
apt-get install nvme-cliAlmaLinux/CentOS:
dnf install nvme-cli
Now, list your NVMe drives:
nvme list
Identify the drive path (e.g., /dev/nvme0n1) and run a SMART log check:
nvme smart-log /dev/nvme0n1
Look closely at the output for these specific lines:
critical_warning: Should be 0.
media_errors: Should be 0 (or a very low number).
percentage_used: Shows the wear level of the drive.
If the SMART log shows no critical warnings and zero media errors, your drive is physically healthy. The log flood is purely a kernel/motherboard communication bug.
Phase 3: The Root Causes (ASPM vs. Linux)
Why does this happen on perfectly healthy servers? The primary culprit is almost always Active State Power Management (ASPM).
ASPM is a power-saving protocol used on PCIe links. To save electricity, the motherboard attempts to put the PCIe link connected to the NVMe drive into a low-power "sleep" state (L0s or L1) when data isn't actively being transferred. When the server suddenly needs data, it "wakes up" the link.
However, waking up a Gen 4/Gen 5 NVMe connection takes nanoseconds. If the motherboard's BIOS, the NVMe controller, and the Linux kernel are not in perfect synchronization regarding how long this wake-up should take, the link experiences a microscopic timing timeout. The hardware instantly fixes it, but logs a "Corrected Error."
This constant fighting between the power management trying to sleep, the OS trying to wake it, and the resulting signal corrections causes the infinite log loop.
Phase 4: Applying the GRUB Bootloader Fix
To resolve this, we must pass specific boot parameters to the Linux kernel via the GRUB bootloader. There are two ways to fix this: The precise way (disabling ASPM), and the nuclear way (disabling AER entirely). We highly recommend trying Option A first.
Option A: Disable ASPM (pcie_aspm=off)
This is the safest and most technically correct fix. It tells the Linux kernel to stop trying to manage power states for the PCIe bus. In a dedicated server environment, you do not care about saving 2 watts of power on an NVMe link; you care about maximum performance and stability.
-
Step 1: Open the GRUB Configuration File
Use a text editor like nano or vi to open the default GRUB configuration file.
Bashnano /etc/default/grub -
Step 2: Append the Boot Parameter
Find the line that begins with
GRUB_CMDLINE_LINUX_DEFAULT=(orGRUB_CMDLINE_LINUX=on some RHEL-based systems). This line contains arguments passed to the kernel at boot.Carefully append
pcie_aspm=offinside the quotation marks, separated by a space from any existing arguments.Before:
GRUB_CMDLINE_LINUX_DEFAULT="quiet splash"After:
GRUB_CMDLINE_LINUX_DEFAULT="quiet splash pcie_aspm=off"
-
Step 3: Save the file.
Save and exit your text editor (Ctrl+O, Enter, Ctrl+X in nano).
Option B: The Nuclear Option (pci=noaer)
If disabling ASPM does not stop the log flood, you must use the pci=noaer fix. This parameter tells the Linux kernel, "Completely ignore all Advanced Error Reporting interrupts from the PCIe bus. Do not log them, do not process them."
(Note: This stops logging ALL PCIe errors, including uncorrected ones. However, if a fatal uncorrected error occurs, the server will usually lock up or the drive will drop offline anyway, so you will still know there is a problem. For 99% of admins, pci=noaer is a perfectly safe and accepted industry workaround).
-
Step 1: Open the GRUB Configuration File
Bashnano /etc/default/grub -
Step 2: Append the Boot Parameter
Modify the
GRUB_CMDLINE_LINUX_DEFAULT=line. You can safely run this alongside the ASPM fix if you wish.After:
GRUB_CMDLINE_LINUX_DEFAULT="quiet splash pcie_aspm=off pci=noaer"
Phase 5: Rebuilding GRUB and Rebooting
You have told GRUB what you want to do, but you must compile those instructions into the actual boot file the system uses. The command to do this differs depending on your operating system.
For Ubuntu / Debian Systems:
Simply run the update-grub wrapper script:
update-grub
You should see output stating Generating grub configuration file...
For AlmaLinux / Rocky Linux / CentOS / RHEL Systems:
Red Hat-based systems require you to use grub2-mkconfig. First, verify whether you are on a UEFI or Legacy BIOS system (almost all modern NVMe dedicated servers at EPY Host use UEFI).
Run the command:
grub2-mkconfig -o /boot/grub2/grub.cfg
(Note: On older CentOS 7 systems with UEFI, the output path might be /boot/efi/EFI/centos/grub.cfg, but for modern AlmaLinux 8/9, standardizing on /boot/grub2/grub.cfg or using grub2-mkconfig -o $(find /boot -name grub.cfg) is correct).
Reboot the Server
Once the configuration is generated, gracefully reboot your dedicated server to apply the kernel parameters:
reboot
Phase 6: Verification and Cleaning Up the Mess
When your server comes back online, log in via SSH.
Step 1: Verify the Kernel Parameters Applied
Run the following command to check the active parameters the kernel booted with:
cat /proc/cmdline
You should see pcie_aspm=off and/or pci=noaer listed in the output. If they are there, the fix is active.
Step 2: Verify the Logs are Quiet
Run a live tail on your system logs.
Ubuntu/Debian:
tail -f /var/log/syslogAlmaLinux/RHEL:
tail -f /var/log/messages
The torrential flood of PCIe Bus Error: severity=Corrected messages should be completely gone. Your terminal will finally be quiet.
Step 3: Reclaim Your Disk Space
While the kernel has stopped generating new error logs, your disk is still full of the old ones. The Linux logrotate daemon will eventually compress and delete them, but if your disk is sitting at 99% capacity, you need to intervene manually to prevent database crashes.
Navigate to your log directory:
cd /var/log/
Look for massive, archived syslog or messages files. They often look like syslog.1, syslog.2.gz, or messages-20260315.
You can safely delete the rotated archives:
rm -f syslog.*
# OR
rm -f messages-*
Crucial Warning: Do not use the rm command on the active, currently open log file (/var/log/syslog or /var/log/messages). If you delete the active file while the rsyslog daemon is running, the space won't actually be freed until the daemon restarts.
Instead, if the active file is massive, you can truncate it (empty it to zero bytes) without deleting the file itself by running:
> /var/log/syslog
# OR
> /var/log/messages
Check your disk space again using df -h. Your primary partition should be back down to a healthy utilization percentage.
Conclusion
The NVMe bus error Linux syslog flood is a modern annoyance born from the incredible speeds of contemporary hardware clashing with legacy power management protocols. Seeing thousands of hardware errors per minute is terrifying for any system administrator, but understanding the difference between a "Corrected" AER event and an actual physical failure is key to maintaining your sanity.
By applying the pcie_aspm=off or pci=noaer kernel parameters, you have successfully instructed your server to prioritize high-performance data integrity over negligible power savings, effectively ending the log spam loop.
If you applied these fixes and your NVMe drive continues to drop offline, remount as read-only, or show errors in the nvme smart-log, you may be dealing with a genuine hardware failure.

